How To Create / Import / Edit / Activate Macros On MacroGamer?
Here is a short guide to create macros on macrogamer tool. We have shared the detailed instructions that you can follow in order to create, import, edit and activate the macros on your own. Additionally, you can follow our steps exactly in order to be able to create a macro script and an autoclick script as well.
How To Create A Macro Manually?
Let’s now check out the steps to create the macros manually.
- First of everything, you should download macro gamer from our home page.
- Once it is downloaded, you can follow the instructions to install it. The same are available on our homepage itself. Otherwise, check out the next step to know how to install it.
- Double click the installation file, hit Next and click Next again if asked. Select the destination folder and also select the desktop shortcut and hit “Close” button.
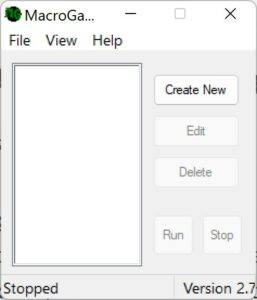
- Go back to the desktop and double click the macrogamer shortcut to launch it.
- Now, click “Create New” button to start creating a new macro.
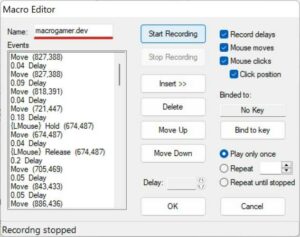
- Enter any name for the macro.
- You can select what to record and what not to record.
- Select or de-select the options “Record Delays”, “Mouse Moves”, “Mouse Clicks” and “Click Position” based on your objectives.
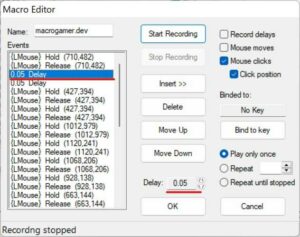
- Now, click “Start Recording” button to record the mouse clicks, mouse moves and the key strokes.
- Now, click on the areas of the screen by moving your mouse and also enter the keys from the keyboard.
- Everything will be recorded as shown in the above image. Now, hit “Stop Recording” option to end the recording.
- If you can clearly observe the scripts added into the macro, you will be able to see mouse moves, delays, mouse clicks, etc.
- This way, you have can create a macro.
Here Is A List Of Best Guides That We Have Written For You:
How To Make MacroGamer As Your AutoClicker?
Let’s say for example, you need only clicks and you would want to use them on the roblox or minecraft game. You can follow the below guidelines to capture only the mouse clicks in your macro.
- Launch the macro gamer on your windows pc.
- Select only “Mouse Clicks” and “Click Position” options for the autoclicker macro.
- Hit “Start Recording” option and move your mouse across the screen and start clicking everywhere you want to click.
- Everything will be added into the macro. You can check out the below image for reference.
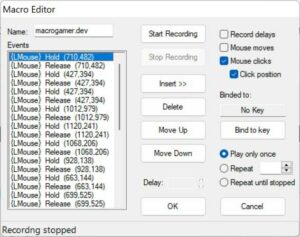
- Now, you cas select each step from the macro and delete any unwanted clicks by clicking on the “Delete” button.
- Additionally, you can also add delays manually.
- In order to add the delays between the clicks, hit “Insert” button and select the “Delay”.
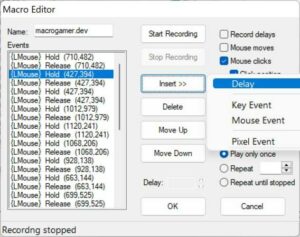
- If you want to change the delay time, select the delay from the script and navigate to Delay option as indicated in the below image.
- Use the Up / Down arrows to alter the delay time.
Hit “OK” button finally to save the macro to your pc. The macro file will be saved as macrogamer.dev.mgp. You can import the macro script anytime you want since the settings will be stored in the macro itself.
How To Bind The Macro To A Hotkey?
Let’s now check out the instructions that helps you in setting a hotkey to the macro that you create.
- Make sure that you have the macro either created manually or imported from the pc.
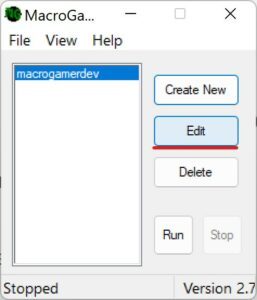
- Select the macro from the home screen and hit “Edit” button to launch the macro editor window.
- Now, go to “Bind to Key” button and click on it.
- Assign any key to the macro from your keyboard. You should select the key in combination with either Ctrl, Fn, Shift or Alt keys.
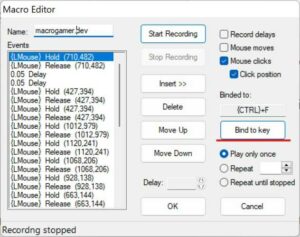
- Because the single key strokes from the keyboard might result into a glitch and create a mess while executing the macro.
You are all set now. You can hit “OK” button to save the macro and use it anytime you want.
How To Activate Macro In Game? [Roblox, Minecraft or Any Other Game]
Now, you have created the macro yourself. Check out the simple steps to activate the macro in the game while you are playing.
- Launch the macrogamer on your personal computer.
- Create the macro or import the already created macro to the macrogamer software. You can import the file by following the path
File > Import Project > Select the file from pc. - Click on the “Run” button which is available on the home screen of the macro gamer software.
- Now, launch the game that you want to play.
- Press the hotkey from the keyboard. For example, “Ctrl+F” and you can see the macro starts working in the game.
Ok guys! you have come to the end of the tutorial. We have seen how to create macro, how to import macros, how to set hotkeys and how to activate macros in the games. If you want to know more about any other thing, let us know in the comments below this article.
![How To Speed Glitch Da Hood Using Macro Gamer [Best Settings]](https://macrogamer.dev/wp-content/uploads/2022/09/create-speed-glitch-macro-for-da-hood-768x603.jpg)